DIY Car Play Table
Create a DIY play car table out any table using paint and artificial grass.
Yield: 1 Car Play Table
Equipment
- Marker
- Pencil
- White Colored Pencil
- Ruler or Measuring Tape
- Paint brush
- Foam brush
Materials
- Large sheet of paper or small pieces taped together, the size of your table (to create your blueprint) plus additional sheets for turf patterns.
- Black Acrylic Paint -use a high quality paint preferably a gloss black
- Blue Acrylic Paint
- White Acrylic Paint
- White Puffy Paint
- Yellow Puffy Paint
- Blue Puffy Paint
- Green Turf Grass -available by the foot at most hardware stores
- Weldwood Contact Cement
Instructions
- Make a blueprint of your car table using a large piece of paper. Make sure your large piece of paper is roughly the size of the table you are making. Get creative and use a marker to draw your layout.
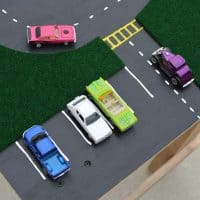
- It’s helpful to use actual matchbox cars when working on the blueprint in order to create a more lifelike size in relation to the cars. For reference, on our play car table the parking spaces are 1.5″ apart and 2.5″ long. The width of the road is 3″. The crosswalk is 1″ wide.
- Use a pencil to draw the layout on the table. Use a ruler or tape measure to draw straight lines.
- Label the areas you want to cover with grass with a number. Each area should have a different number. Instead of grass you could also use sand or rocks depending on the landscape you want.
- Start by painting the road areas with black paint. You really want to use a quality paint on the roads. We used a high gloss multi-surface indoor/outdoor acrylic paint for the road.
- Use blue paint to paint in a pond, if part of your plan.
- Take a separate set of paper (or small pieces taped together) and create a template for the grass areas.
- Number the paper template with the same number as that area on the table.
- Place the paper template onto the turf grass. Make sure it’s face down. You’ll mark on the back of the turf grass with white colored pencil.
- Use scissors to cut it out and place onto your table to make sure it fits.
- Continue to cut the remaining areas of turf for your table and checking to see that they fit on the table.
- In a well ventilated area, and according to the directions on the can, apply the contact cement with the foam brush.
- Apply the contact cement to the table and then to the back of the turf grass before placing them onto the top of the table. Press down firmly.
- Repeat until all grass is attached to the table.
- Use a white colored pencil to draw the dashed road lines onto the paint.
- On our play car table the parking spaces are 1.5″ apart and 2.5″ long. The width of the road is 3″. The crosswalk is 1″ wide.
- Use white puffy paint to trace the white pencil marks and apply the road striping.
- Use yellow puffy paint for the crosswalks, white for the road and parking.
- Use blue paint for the handicap spaces.
- Let dry completely (overnight) and play!